Frequently Asked Question
DrawTech Installation Guide
Last Updated 3 years ago
Foreword:
You can also find similar instructions for installing DrawTech in your C:\drawtech7\Manual folder.
Please ensure that you’re running a Windows user account that has administrator privileges or that you have credentials for an administrator privileges on hand.
Also, please ensure that your hardware lock is unplugged until specified otherwise later in this guide.
Obtaining and running the DrawTech installer -
To begin this process, you will need a Full Installation package of our software. If you are a DrawTech customer with an active support subscription and need a Full Installation package. You can simply email us at support@drawtech.com and we’ll send you a copy of the most current version of our software.
Once you have the installation package, run it. Simply follow the prompts to install all the needed DrawTech files on your machine.
Setting up your hardware lock -
Once the installer has finished installing DrawTech, we will need to install the drivers for your hardware lock. Navigate to C:\drawtech7\HardwareLock and then run the CBUSetup.exe file. Once you run that file, you’ll simply need to follow the prompt guides to install the CRYPTO-BOX drivers.
Once the installation has finished. Please insert your hardware lock into a working USB port on your machine.
Configuring your AutoCAD installation to run DrawTech -
Please understand, that you’ll need to perform the following steps for each installation of AutoCAD on your machine. So if you’re using AutoCAD 2012 and AutoCAD 2014, you will need to configure both of those installation separately to use DrawTech.
Loading the Profile -
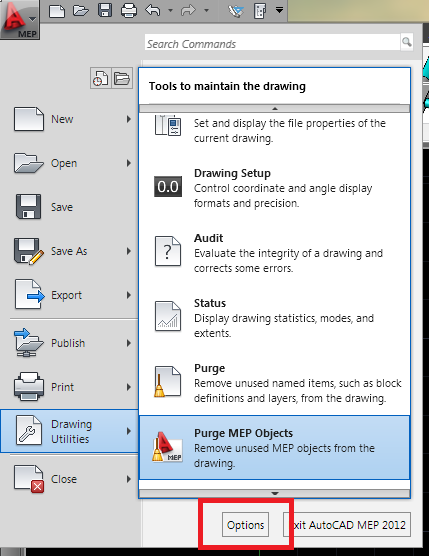
Now that DrawTech is fully installed, we will need to configure AutoCAD to load it. First, we will need to open the AutoCAD options menu. You can do this by entering OPTIONS in the command box or navigating to the AutoCAD button on the top left of your screen and then hitting options as shown below.
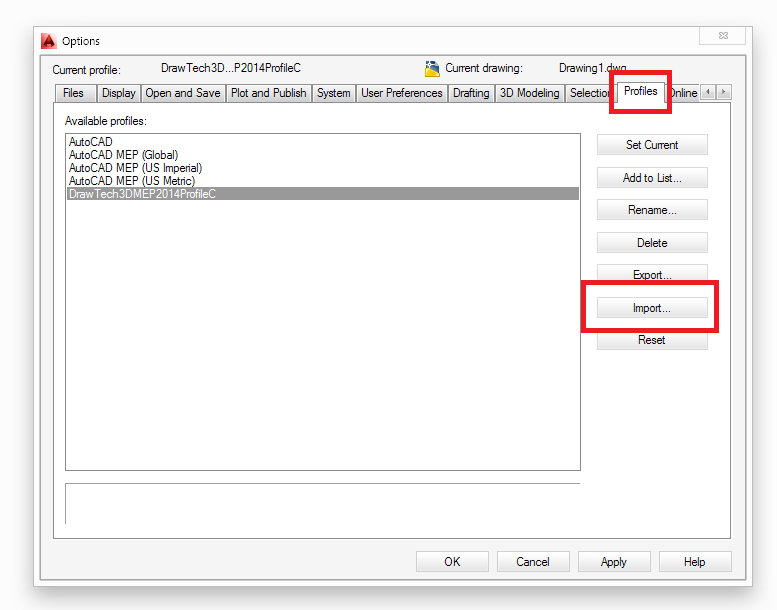
Once the options dialog is open, navigate to the Profiles tab and then click the “Import…” button as shown in the screenshot below.
At this point, you will be presented with a Windows dialog window to select your profile file. In the dialog window, navigate to the C:\drawtech7 folder, in this folder there is a list of profile files available to you – please continue reading to select the correct profile file.
Every profile file is named based on what purpose it serves and what year of AutoCAD it is compatible with. For example, DrawTech3DMEP20XXProfileC where 20XX represents the version year of AutoCAD you are using. So if you’re using AutoCAD 2014, you’ll load a profile that has 2014 in the name (such as DrawTech3DMEP2014ProfileC). Below goes into further detail about the intended purposes for each profile file.
DrawTech3DMEP20XXProfileC (Requires AutoCAD MEP) is for users who wish to run both DrawTech 3D and 2D using the AutoCAD ribbon interface. This is what most users will use.
DrawTechMEP20XXProfileC (Requires AutoCAD MEP) is for users who wish to use the DrawTech 2D software with the Toolbar interface.
DrawTechR20XXProfileC (Can be used in Vanilla AutoCAD) is for users who want to use DrawTech 2D in Vanilla AutoCAD.
It is at this point you will need to select the profile file that you want to load based on what version of AutoCAD you are using and what purpose you want DrawTech to serve in your drafting work.
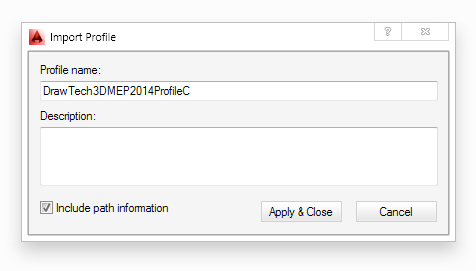
Once you have selected the profile file you want to use and have chosen it in the Windows dialog window, an AutoCAD window will come up asking if you want to enter a description for the profile. This has no impact on using the software. Click “Apply & Close” and make sure “Include Path Information” is checked.
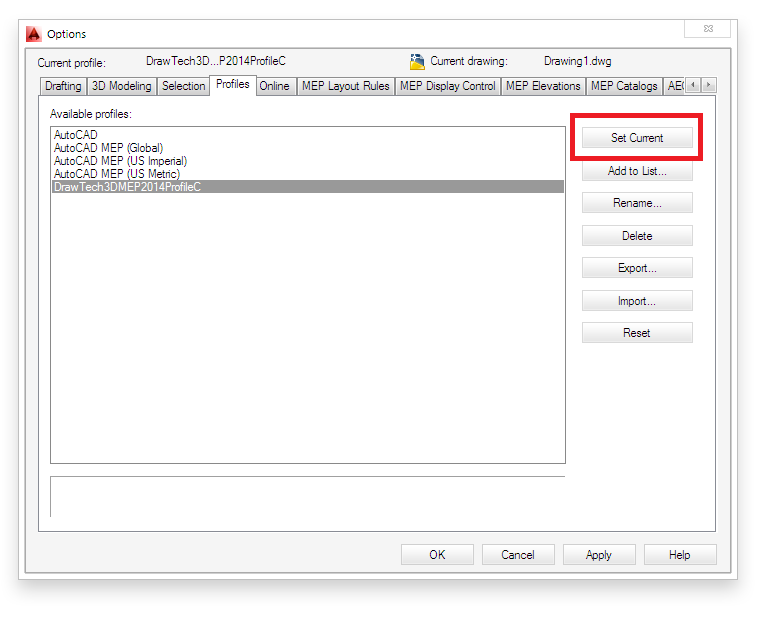
At this point, we will need to set the profile as the current profile. In the Options dialog under the Profiles tab, simply click and highlight the DrawTech profile within the dialog and then hit “Set Current”.
Click “Apply” and then “OK” to save these settings and close the AutoCAD options dialog.
Loading the CUIX file -
Now we need to load the DrawTech Custom User Interface (CUIX) file. We can do this by entering in the AutoCAD command MENULOAD. Once we do that, we’ll receive the following prompt.
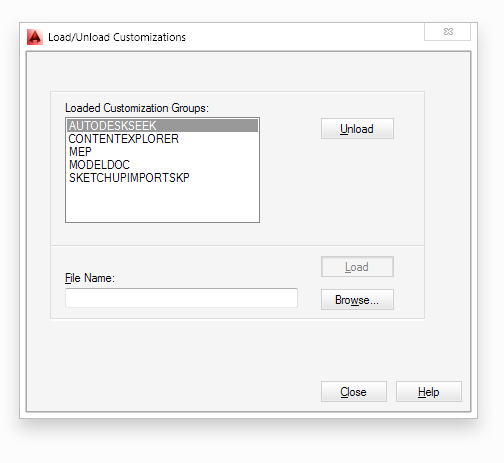
Once this window has opened click the “Browse…” button. Once the Windows file selection window appears, navigate to C:\drawtech7\DW\MN\ and select the “DrawtechDuct2010.cuix” file. Then you will need to click the “Load” button in the MENULOAD window. Once you do that, you will see a “DRAWTECHDUCT” entry appear in the “Loaded Customization Groups” box appear.
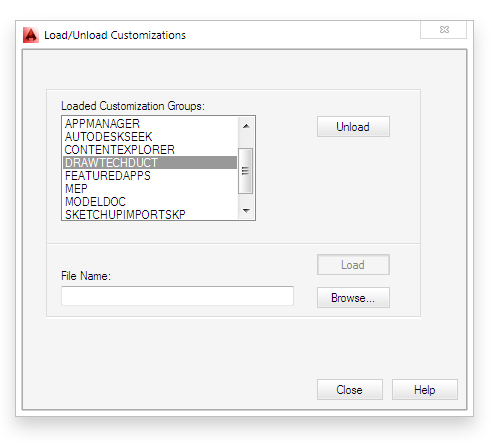
You can now close the MENULOAD window by clicking the “Close” button. DO NOT CLOSE AUTOCAD YET.
Creating a shortcut on your desktop to continue using DrawTech.
At this point, the DrawTech software should be running. You may receive a couple of dialog boxes alerting you that company/jobfile settings are not loaded. This is completely normal.
To make launching DrawTech easy for future uses, we highly recommend that you create a shortcut for the DrawTech software. We have a routine that will do this for you.
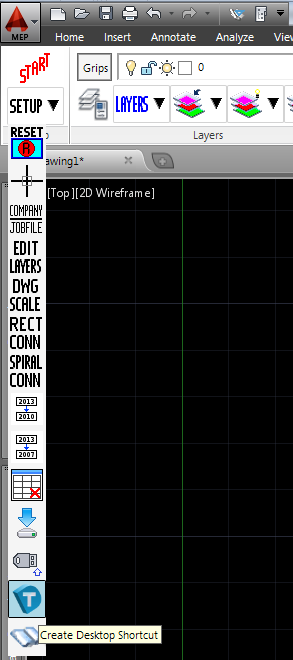
To run the routine, simply pulldown the “SETUP” flyout on your DrawTech ribbon and then click the DrawTech logo – this is the shortcut routine. You will be prompted with a window just confirming a couple of things. You can simply click “Ok” at this point. Now you’ve got a DrawTech shortcut on your desktop tied to that version of AutoCAD.
DrawTech is now fully ready for you to use! Should you have any questions or concerns, please do not hesitate to email us at support@drawtech.com.
You can also find similar instructions for installing DrawTech in your C:\drawtech7\Manual folder.
Please ensure that you’re running a Windows user account that has administrator privileges or that you have credentials for an administrator privileges on hand.
Also, please ensure that your hardware lock is unplugged until specified otherwise later in this guide.
Obtaining and running the DrawTech installer -
To begin this process, you will need a Full Installation package of our software. If you are a DrawTech customer with an active support subscription and need a Full Installation package. You can simply email us at support@drawtech.com and we’ll send you a copy of the most current version of our software.
Once you have the installation package, run it. Simply follow the prompts to install all the needed DrawTech files on your machine.
Setting up your hardware lock -
Once the installer has finished installing DrawTech, we will need to install the drivers for your hardware lock. Navigate to C:\drawtech7\HardwareLock and then run the CBUSetup.exe file. Once you run that file, you’ll simply need to follow the prompt guides to install the CRYPTO-BOX drivers.
Once the installation has finished. Please insert your hardware lock into a working USB port on your machine.
Configuring your AutoCAD installation to run DrawTech -
Please understand, that you’ll need to perform the following steps for each installation of AutoCAD on your machine. So if you’re using AutoCAD 2012 and AutoCAD 2014, you will need to configure both of those installation separately to use DrawTech.
Loading the Profile -
Now that DrawTech is fully installed, we will need to configure AutoCAD to load it. First, we will need to open the AutoCAD options menu. You can do this by entering OPTIONS in the command box or navigating to the AutoCAD button on the top left of your screen and then hitting options as shown below.
Once the options dialog is open, navigate to the Profiles tab and then click the “Import…” button as shown in the screenshot below.
At this point, you will be presented with a Windows dialog window to select your profile file. In the dialog window, navigate to the C:\drawtech7 folder, in this folder there is a list of profile files available to you – please continue reading to select the correct profile file.
Every profile file is named based on what purpose it serves and what year of AutoCAD it is compatible with. For example, DrawTech3DMEP20XXProfileC where 20XX represents the version year of AutoCAD you are using. So if you’re using AutoCAD 2014, you’ll load a profile that has 2014 in the name (such as DrawTech3DMEP2014ProfileC). Below goes into further detail about the intended purposes for each profile file.
DrawTech3DMEP20XXProfileC (Requires AutoCAD MEP) is for users who wish to run both DrawTech 3D and 2D using the AutoCAD ribbon interface. This is what most users will use.
DrawTechMEP20XXProfileC (Requires AutoCAD MEP) is for users who wish to use the DrawTech 2D software with the Toolbar interface.
DrawTechR20XXProfileC (Can be used in Vanilla AutoCAD) is for users who want to use DrawTech 2D in Vanilla AutoCAD.
It is at this point you will need to select the profile file that you want to load based on what version of AutoCAD you are using and what purpose you want DrawTech to serve in your drafting work.
Once you have selected the profile file you want to use and have chosen it in the Windows dialog window, an AutoCAD window will come up asking if you want to enter a description for the profile. This has no impact on using the software. Click “Apply & Close” and make sure “Include Path Information” is checked.
At this point, we will need to set the profile as the current profile. In the Options dialog under the Profiles tab, simply click and highlight the DrawTech profile within the dialog and then hit “Set Current”.
Click “Apply” and then “OK” to save these settings and close the AutoCAD options dialog.
Loading the CUIX file -
Now we need to load the DrawTech Custom User Interface (CUIX) file. We can do this by entering in the AutoCAD command MENULOAD. Once we do that, we’ll receive the following prompt.
Once this window has opened click the “Browse…” button. Once the Windows file selection window appears, navigate to C:\drawtech7\DW\MN\ and select the “DrawtechDuct2010.cuix” file. Then you will need to click the “Load” button in the MENULOAD window. Once you do that, you will see a “DRAWTECHDUCT” entry appear in the “Loaded Customization Groups” box appear.
You can now close the MENULOAD window by clicking the “Close” button. DO NOT CLOSE AUTOCAD YET.
Creating a shortcut on your desktop to continue using DrawTech.
At this point, the DrawTech software should be running. You may receive a couple of dialog boxes alerting you that company/jobfile settings are not loaded. This is completely normal.
To make launching DrawTech easy for future uses, we highly recommend that you create a shortcut for the DrawTech software. We have a routine that will do this for you.
To run the routine, simply pulldown the “SETUP” flyout on your DrawTech ribbon and then click the DrawTech logo – this is the shortcut routine. You will be prompted with a window just confirming a couple of things. You can simply click “Ok” at this point. Now you’ve got a DrawTech shortcut on your desktop tied to that version of AutoCAD.
DrawTech is now fully ready for you to use! Should you have any questions or concerns, please do not hesitate to email us at support@drawtech.com.